

服务器上文件多了之后,「找文件」就成了日常最高频的操作之一:日志滚到哪了、哪个文件把磁盘吃满了、一周前生成的备份在哪、想把几十个配置文件批量改一下……这些场景全都离不开 find 和 locate。
本文在 Ubuntu 24.04 服务器上把命令全部真实执行验证了一遍(findutils 4.9.0 + plocate 1.1.19),从 find 的基础过滤讲到 -exec/-delete 批量操作,再到 locate 的秒级全盘搜索,附终端实测截图,可以直接照着抄。
版本现状:先说清楚你用的哪个 find
find 来自 GNU findutils 软件包(同时包含 locate、updatedb、xargs)。目前的最新稳定版是 4.11.0(2026 年 7 月 11 日发布),主要变化是 -mount 的行为对齐 POSIX 2024 标准并大幅完善文档;Ubuntu 24.04 软件源自带的 4.9.0 对日常使用完全够用,无需手工升级。
而 locate 在 Ubuntu 24.04 上默认实现是 plocate——旧版 mlocate 的过渡包已在 2023 年被移除,直接 apt install mlocate 会报「没有可安装的候选」,所以新系统一律用 plocate。
find --version | head -1
# find (GNU findutils) 4.9.0

plocate --version | head -1
# plocate 1.1.19
准备工作:搭一个演示目录
为了演示,我在服务器上建了一个模拟真实项目的目录结构,下文所有命令都在 /root/find-lab 下执行(配置、日志、备份、临时文件混在一起,和真实服务器差不多):
mkdir -p /root/find-lab/{config,logs,backup,tmp}config/:app.conf、nginx.conf、db.conf 等配置文件logs/:access.log、app.log、error.log 等日志(大小、新旧各不相同)backup/:两个不同日期的 sql 备份(512K / 1M)tmp/:一个 600 权限的 secret.tmp 和隐藏文件 .hidden
基础过滤:按名字、类型、大小、权限筛选
按文件名查找:-name 与 -iname
-name 支持通配符(*、?、[]),注意必须加引号,否则 * 会被 shell 提前展开:
find . -name '*.log'
# ./logs/error.log
# ./logs/2026/08/today.log
# ./logs/access.log
# ./logs/app.log
-iname 则忽略大小写,-iname '*.LOG' 也能找到上面这些文件。
按类型过滤:-type
-type 按文件类型过滤,最常用的是这几个取值:
| 取值 | 含义 |
|---|---|
f | 普通文件 |
d | 目录 |
l | 符号链接 |
s | socket |
p | 管道 |
组合条件:多个条件默认是「与」
find 的多个条件之间默认是 AND(同时满足),可以自由叠加:
find . -type f -name '*.log' -size +50k
# ./logs/error.log
# ./logs/app.log
需要「或」用 -o,取反用 -not(或 !),复杂表达式用 \( \) 转义括号分组。下面的截图在演示目录里真实执行了四类最基础的过滤:
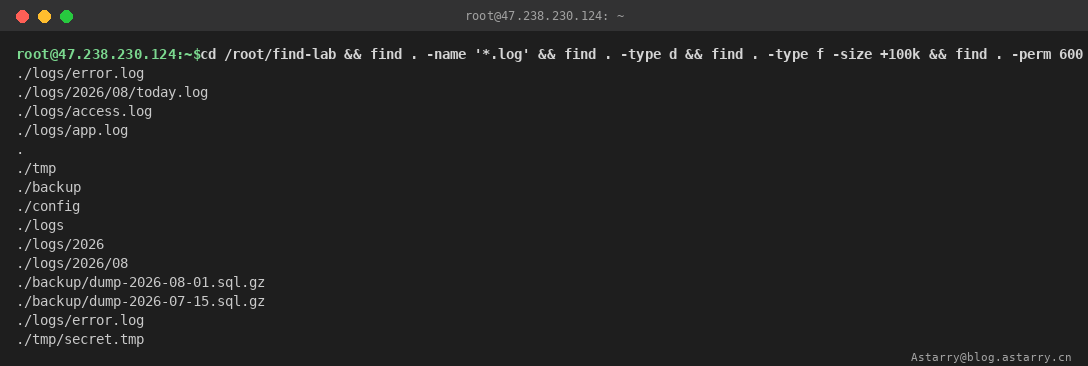
从上到下依次是:-name '*.log' 找到 4 个日志文件;-type d 列出全部 7 个目录;-type f -size +100k 找到超过 100KiB 的 3 个文件(两个备份 + error.log);-perm 600 精确匹配权限为 600 的文件(只有 secret.tmp)。
按大小:-size
-size 不带后缀时单位是 512 字节块,日常建议直接带 k/M/G 后缀(注意是 KiB/MiB,1k = 1024 字节):
find . -type f -size +1M     # 大于 1MiB
find . -type f -size -100k   # 小于 100KiB
find . -type f -size +100k   # 大于 100KiB
按时间:-mtime / -mmin / -atime
-mtime 按修改时间过滤,参数是「天数」,语法很特别:
| 写法 | 含义 |
|---|---|
-mtime -7 | 7 天内(含)修改过的 |
-mtime 7 | 恰好 7 天前(±24h 窗口) |
-mtime +7 | 7 天前(不含)就再没动过的 |
时间敏感的场景用 -mmin(分钟级)更精确:find . -type f -mmin -30 找最近半小时改过的文件。-atime(访问时间)、-ctime(元数据变更时间)语法相同。
按权限:-perm
find . -perm 600      # 权限恰好是 600
find . -perm -600     # 权限包含 600 的全部位(如 640 也命中)
find . -perm /600     # 至少包含 600 中任一权限位
配合 -user、-group、-nouser 还能按属主过滤,排查「孤儿文件」很好用。
进阶操作:-exec、-delete 与 -printf
筛选只是第一步,find 真正强大的是直接对结果执行操作。
-exec:批量执行任意命令
-exec 对每个匹配的文件执行一条命令,{} 会被替换成文件路径:
find . -name '*.conf' -exec echo 'found: {}' \;
# found: ./config/app.conf
# found: ./config/db.conf
# found: ./config/nginx.conf
# found: ./config/app-link.conf
注意两个细节:
- 结尾的
\;表示对每个文件各执行一次命令(分号需要转义防止 shell 截断); - 如果改成
{} +,find 会把所有文件打包成一批传给命令(和 xargs 同理,参数多了自动分批),性能更好。
另外上面的输出里出现了一个「意外」:config/app-link.conf 是个符号链接,它的名字也以 .conf 结尾,所以 -name '*.conf' 把它也匹配了——默认情况下 find 不跟随软链接,匹配到的是链接本身。想跟着链接继续往下找,加 -L 参数。
-delete:直接删除(先预览再动手)
find . -name '*.tmp' -delete-delete 隐含 -depth(先处理子项再处理目录本身),删除没有确认提示。安全习惯是先不加 -delete、改成 -print 预览一遍结果,确认无误再删。下面的截图演示了完整的「查 - 批量操作 - 删 - 验证」流程:
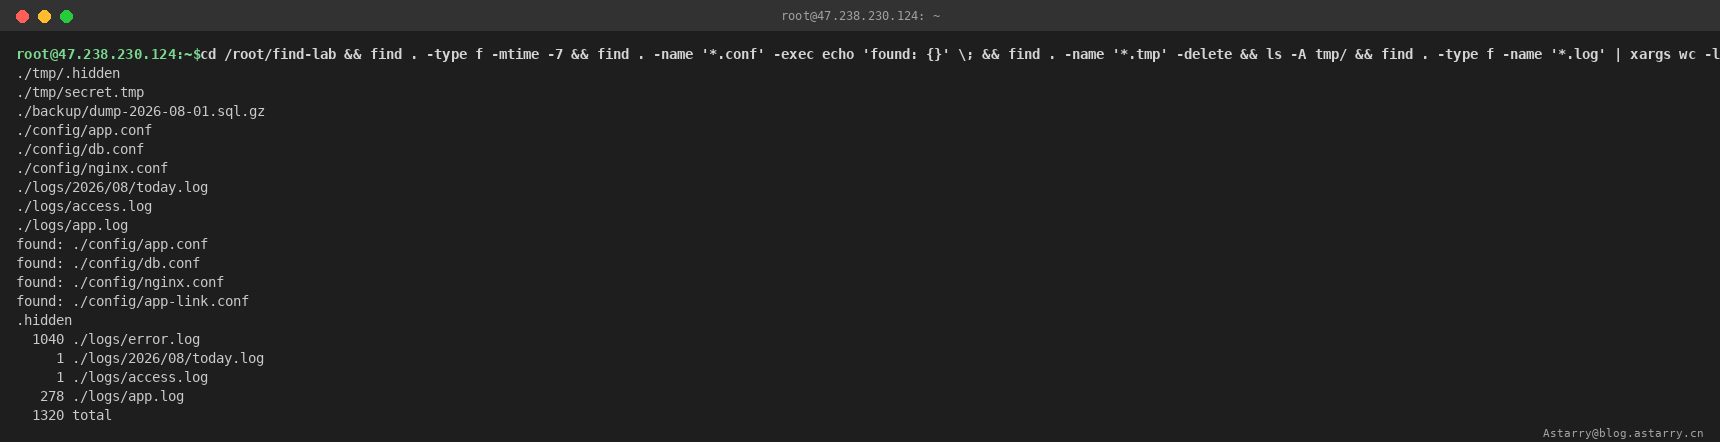
流程解读(从上到下):
find . -type f -mtime -7:列出 7 天内修改过的 9 个文件(把备份、配置、日志都筛出来了);find . -name '*.conf' -exec echo 'found: {}' \;:对每个 .conf 文件执行 echo;find . -name '*.tmp' -delete:删除 tmp 下的 secret.tmp(无输出);ls -A tmp/:验证——目录里只剩.hidden一个隐藏文件,secret.tmp 确实被删掉了;find . -type f -name '*.log' | xargs wc -l:把所有日志的行数统计出来,最后一行1320 total是合计。
-printf:格式化输出
-printf 可以自定义输出格式,配合 sort/head 就是「找大文件」的利器:
find . -type f -printf '%s 字节  %p\n' | sort -rn | head -3
# 1048576 字节  ./backup/dump-2026-07-15.sql.gz
# 524288 字节  ./backup/dump-2026-08-01.sql.gz
# 262144 字节 ./logs/error.log常用格式符:%p 完整路径、%f 文件名、%s 大小(字节)、%m 权限位、%TY-%Tm-%Td 修改日期、%u 属主。
搭配 xargs 的空格陷阱
find | xargs 是经典组合,但文件名带空格时会炸(xargs 默认按空白切分)。安全写法是用 NUL 分隔:
find . -name '*.log' -print0 | xargs -0 wc -l其实直接 find ... -exec {} + 内部就自动处理了这个问题,能不用管道就不用管道。
实战组合:三个高频场景
场景一:清理 30 天前的日志
# 先预览(只打印,不删)
find /var/log -type f -name '*.log' -mtime +30 -print

# 确认无误后执行(配合 journald 的 journalctl --vacuum-time 一起用)
find /var/log -type f -name '*.log' -mtime +30 -delete
场景二:找出全盘最大的 10 个文件
find / -type f -printf '%s %p\n' 2>/dev/null | sort -rn | head -102>/dev/null 把因权限不足报错的输出丢掉,不影响结果。
场景三:批量修改
find /opt/app -type f -name '*.sh' -exec chmod +x {} \;
find /data/upload -type f -mtime +90 -exec rm {} \;
locate / plocate:秒级全盘搜索
find 每次都要实时遍历目录,全盘搜索(find / -name xxx)可能卡上几十秒。locate 走的是数据库查询,毫秒级返回——代价是它查的是预建的索引,不是实时的。
安装与更新数据库
Ubuntu 24.04 直接装 plocate:
sudo apt install -y plocate
sudo updatedb        # 手动重建数据库
系统每天会自动跑 /etc/cron.daily/plocate 更新数据库(旧版本叫 mlocate 时还支持增量的 updatedb,plocate 下全量重建也只要几秒)。刚创建的文件不会立刻出现在搜索结果里,忘了手动 updatedb 就查不到新文件,这是用 locate 最容易踩的坑。
常用参数
locate app.conf              # 精确子串匹配(路径里包含就算)
locate -i '*.SQL.GZ'         # 忽略大小写
locate -n 10 '*.log'         # 只显示前 10 条
locate -c '*.log'            # 只统计数量
locate --regex 'dump.*2026'  # 正则匹配
注意 plocate 和旧 mlocate 的一个行为差异:plocate 的多个搜索模式之间默认是「与」(AND),而 mlocate 默认是「或」(OR),所以 plocate 没有 mlocate 的 -A/--all 参数。另外 plocate 去掉了 -S/--statistics,新增了 --regex 和 -N/--literal。
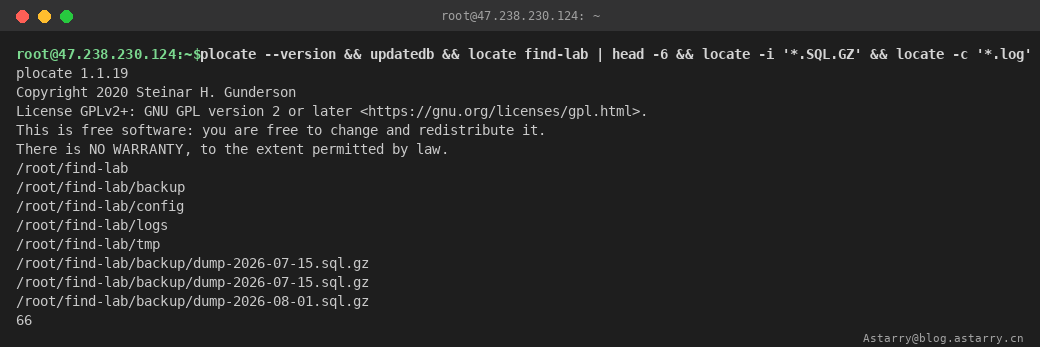
截图为 plocate 1.1.19 的真实执行:重建数据库后 locate find-lab 秒出 6 条路径,-i '*.SQL.GZ' 忽略大小写命中两个备份文件,-c '*.log' 统计出全系统 66 个 .log 路径:
find vs locate:怎么选
| 需求 | 用哪个 |
|---|---|
| 只要文件名/路径,追求速度 | locate |
| 按大小、时间、权限、类型过滤 | find |
| 对结果执行操作(删、改、统计) | find |
| 刚创建的文件立即要搜到 | find(locate 数据库有延迟) |
| 结合正则、复杂组合条件 | 两者皆可(locate --regex / find -regex) |
一句话总结:要快用 locate,要准确和能干活的用 find;日常排查先 locate 定位、再用 find 精确处理,是最顺手的工作流。
评论 (0)
暂无评论,快来抢沙发吧!